How to Charge AirPods Without a Case
Discover the truth about how to charge AirPods without a case. Uncover myths, find alternatives, and safeguard your audio experience.
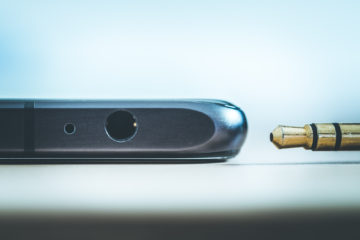
Nowadays, most smartphones (even ones with a headphone jack) have IP67 or IP68 waterproof ratings; hence, they won’t give in to water damage very easily. However, if your phone fell in the water and had a good ol’ soak for a couple of seconds, the speaker grilles and headphone jack will have water pooling inside.
So, you might be wondering, is it possible to get water out of an Android phone’s headphone jack?
Luckily, yes. You can save your phone’s headphone jack from water damage. The most common solution is burying your phone in a packet full of uncooked rice and letting it sit for an entire day. The rice acts as a natural dessicant, absorbing any moisture that can be clogged up inside the headphone jack.
However, this rice method (Which I came to know about from watching the pilot episode of “Elementary”) is not the most ideal, and in some cases: it can do more harm than good. Therefore, we need to talk about proper alternatives and what your first steps should be.
Here’s a quick overview of what I’ll be covering:
A broken headphone jack is not good, what more is a water-clogged audio jack. One of the most overlooked reasons why headphones keep breaking is water damage. It’s a silent and deadly killer, especially considering that a single drop of water can cause permanent damage to your headphones or earbuds.
So before you start drying the phone right away, you need to assess the damage. If your phone just got splashed (on the display or the back cover) and didn’t get fully submerged, you might have nothing to worry about. That said, if you see water droplets near the charging port, speaker cutouts, or the headphone port, you might have to follow these steps, especially if your phone doesn’t have an official IP rating.
The first thing you should do when your phone gets splashed or submerged is to take it out. Like the 5-second rule (in this case, more like the 1-second rule) if you manage to take your phone out from the water almost instantly, you have a better chance of minimizing headphone jack water damage.
However, make sure the wet phone isn’t charging. If the phone was plugged into the charger when it came into contact with water, make sure to immediately switch off the charger before touching the phone. Otherwise, you risk damaging the electrical components and electrocuting yourself in the process.
As soon as you’ve safely fished out your phone from whatever body of water you managed to lob it into. (whether that’s a puddle, bathtub, or coffee mug; ouch!), the next thing you should do is switch off the phone.
The best way to do this is by removing the back cover and taking out the removable battery. However, if you are using an android device that was built in the last decade, there’s a good chance you won’t be able to take out the back panel or the removable batteries.
Therefore, your only options are to switch it off using the physical buttons. For an Android phone, you have to keep pressing the power button and the volume down button for around 15 seconds.
If you work out a lot and use TWS earbuds, you know that you have to wipe down the earbuds and equipment after use, it maintains proper hygiene and keeps the devices safe from water damage.
So in this case, before you start dumping in rice or silica gel packets, don’t forget to wipe down the front touchscreen display, sides, and back panel of the phone using a lint-free towel, if you can’t find one, a dry piece of cotton cloth, or cleaning wipes will do, but make sure they won’t clog the charging port.
Then shake off any water droplets that might get stuck inside the ports. You might not be able to completely dry it off by shaking, but you’ll get most of the water out. (Keep the ports facing down when you’re shaking, otherwise, water will only pool up inside.)
Also, if you dropped your phone in saltwater, you will have to get rid of the corrosive effects of saltwater right away. Unfortunately, the only method to do this is to fill up a ziplock bag with fresh water, put your phone inside, and add a touch of baking soda.
One thing you should never do is try to jumpstart the evaporation process using extreme temperatures. Using hair dryers or space heaters to dry your phone is never recommended as it can damage the display and internal components.
So, after you’re done wiping the outer body of the phone, and shaking it out, you’d still have to dry out the phone. There are several methods by which you can do this, and we will discuss several of these important tips.
Also, take note that most of the methods below are dedicated to android users. (Since every iPhone after the iPhone 7 comes with an IP67 rating and no headphone jack.)
One of the best and most widely used moisture-absorbing materials is Silica Gel. It is used in food and medicines as a desiccant to absorb moisture and prevent spoilage.
Although its primary uses are not to absorb moisture from smartphones, Silica Gel is one of the best compounds you can use to dry out the headphone jack of your android phone. All you need to do is get a couple of small silica gel packets, put them and your phone in a clean and dry container (such as a plastic box, vacuum bag, or Tupperware), close the lid, and let it sit for an entire day (or two).
The silica gel will have absorbed most of the moisture that was caught up in the headphone jack and under the display.
Ah yes, the infamous Rice technique. Although not as effective as Silica gel, burying your smartphone in rice can save it from water damage. Even though it’s relatively easier to find a bag of rice, it’s not ideal since you’ll have to deal with the rice grains if you’re not careful.
Before putting your phone to rest inside the “ricetomb,” don’t forget to follow the steps I’ve mentioned in the previous section: switch off, take apart, shake off, and dry out as much as possible.
Similar to the silica gel method, you can put your phone, removable battery, and back panels (if the case can be removed) into a small Tupperware container, pour uncooked rice into it, close the lid, and let it sit for a couple of days. Also, you can set up a small desk lamp or a heat lamp to help accelerate the moisture-absorbing process, but make sure it doesn’t get too hot. (Very useful if you live in colder climates.)
However, when you take out your phone, you will have to clear the headphone jack, charging ports and any other openings from rice grains and starch.
If you can see a lot of water accumulation inside the headphone jack, you can try to wipe it down using a linen-free microfiber cloth or a small cotton cloth.
If you want to reach deeper into the headphone jack, you can roll a corner of a microfiber cloth into a small ball (the size of a cotton swab) and try to reach inside the audio port. However, don’t go too deep or yank out the towel too fast (pieces of cloth can get stuck inside.)
Also, you can try shaking the phone while keeping the piece of cloth inside the headphone jack the piece of cloth will pick up any water droplets without letting them fall back in.
Also, when you’re wiping it down, don’t forget to hold the phone vertically. (With the headphone jack facing the ground.)
If you’re unsure about the rice method or have no time to head into the store, you can always air out your wet phone and let it dry out. This is another safe solution, and many people swear by it, claiming that it’s faster than using uncooked rice or silica gel packets.
After you’ve wiped down the outer body of your phone, set it down on a mug (so that the back panel is exposed), and direct a fan to blow on it.
If you don’t have a fan, you can use the blower side of a vacuum cleaner (where the hot air comes out) to dry your phone. This is a very effective method, and if you use a bag or shirt to cover the phone and blower (such that the hot air gets directed towards the phone), you can dry your phone even faster. However, I don’t recommend this method because keeping the vacuum on for a long time is not good for the vacuum. On top of that, it consumes a lot of power.
Also, if you live in a warmer climate, you can take it out and let the sun do its thing. However, don’t forget to take it out when it gets dark or starts raining.
After you’ve dried your phone using the above methods, I recommend using a Q tip to clean the headphone jack, speaker cutouts, SIM card slots, and any other openings in your phone before you switch it on.
Carefully wipe around the headphone jack and try shaking your phone again to make sure that the phone is completely dry. After that, you can try switching on the phone or taking it to a service center if you’re unsure. (If it were up to me, I would take it to a service center and get the whole thing checked, especially since the circuit board and charging ports inside can suffer from a short circuit.
Sometimes, even if it didn’t come into contact with water, you can have your Android phone stuck in headphone mode perpetually. It is one of the most common Android-related issues and it can be very annoying, especially when you have to take a phone call (since it bypasses the phone’s headset).
Fortunately, before you do a hard reset, there are several alternatives to getting rid of the headphone mode icon. Here’s how to fix android phone stuck in headphone mode.
Plugging your headphones into a wet headphone jack is never a good idea. It is one of the reasons why you might hear interference and the audio coming out crackling and popping. On top of that, it could damage your headphones.
That said, you can use the headphone plug to fix an android phone stuck in headphone mode. However, to be on the safe side, I recommend using a plug from a pair of broken headphones or earbuds (so don’t throw your broken headphones since there are a number of things you can do with broken headphones). Plugging the headphone in and out a couple of times might actually signal the phone to come out of headphone mode.
Android software tends to be buggier than Apple’s standard OS (iOS), especially since it is an open-sourced operating system that Google tries its best to cater to almost every other smartphone manufacturer besides Apple.
A phone stuck in headphone mode is quite common in android phones. However, this issue can go away once you hold the power button, bring up the power menu and restart the phone.
If the headphone icon is still visible and the phone is stuck in headphone mode, you can try performing a soft reset to revert the phone’s settings back to default. This might help resolve bugs in the firmware or third-party apps which also cause headphones to pause music.
Here’s how you can perform a soft reset on your Android phone:
Your apps, photos, and other files will not be deleted with a soft reset. However, Wi-Fi passwords, signed-in accounts, and custom settings will be lost.
Even though the stock Android firmware doesn’t allow it, there are several apps with root access that can override your phone’s headphone mode. However, rooting your phone is not recommended because it voids your phone’s warranty and it can brick your phone.
Here are a couple of apps reserved for Android devices. Unfortunately, I couldn’t get them to work on my Android phone, so use them at your own risk:
Finally, if all the methods stated above do not work, you can always resort to a hard reset. A factory reset will delete all data and revert your phone to the default settings.
Before you go through with this, don’t forget to back up all your data, (including Wi-Fi passwords, account logins, app settings, etc.) and check if you’ve got enough battery.
If a hard reset won’t fix the problem, then it’s surely a hardware issue. The circuitry around the headphone jack might have a short circuit or similar defect where it’s signaling to the sound card that a headphone jack is installed. In that case, you will have to get your phone headphone jack replaced.
If it’s just a little splash, you have a better chance of reviving your phone and getting water out of a headphone jack. However, if your phone was fully submerged in a body of water, and your phone doesn’t have an IP67 (or higher) rating, you should immediately try switching it off, and following the methods I’ve outlined above.
Getting water out of a headphone jack isn’t easy, but with patience and the right tools, you may be able to dry out your headphone jack and enjoy your high-quality tunes once again.